Flying drone DIY, part II: configuration for the 1st version
Intro
I resume work on the project which had been hold on a while ago. This publication covers splitting a project on several versions and process of configuration and ordering components for the 1st version of drone.
Two years ago I worked on the project which aim was to build a drone from ordered components and write own or flash existing firmware.
Research phase helped to rised up and clarified questions to
build a drone. The next pilot phase should help to verify
assumptions and come to production ready solution.
At that moment the further work has been hold on due the decisions
to go at first by the different way. Two years later I got some
time and budget to continue work on this by my own.
Versioning
Given budget constraints and the need to acquire a broad range of new knowledge and skills, the project will be developed iteratively from version to version. Each new version will expand on the previous one, following best practices from LEAN and Agile methodologies.
Below is a preliminary work plan based on the collected requirements.
Table: Components vs Versions (V1 → V4)
| Component | Version 1 | Version 2 | Version 3 | Version 4 | Note |
|---|---|---|---|---|---|
| Frame (type 450–500 mm) | ✔ | ✔ | ✔ | ✔ | Must support 5–6 kg, modular |
| Motors + propellers | ✔ | ✔ | ✔ | ✔ | 12–15" propellers, thrust 1.5× weight |
| ESC x4 | ✔ | ✔ | ✔ | ✔ | 30–60A, BLHeli, ArduPilot compatible |
| Cube Orange + Carrier board | ✔ | ✔ | ✔ | ✔ | Control center, ArduPilot compatible |
| GPS (Here 2/3, Ublox) | ✔ (opt.) | ✔ | ✔ | ✔ | Required for autonomy and return |
| RC controller (FrSky / FlySky) | ✔ | ✔ | ✔ | ✔ | Used even with autonomous flight |
| Battery (LiPo 4S–6S) | ✔ | ✔ | ✔ | ✔ | Capacity depends on weight, e.g. 6000mAh |
| FPV camera + VTx + VRx | ✖ | ✔ | ✔ | ✔ | Video to controller/goggles, analog or digital |
| Jetson Nano / Orange Pi | ✖ | ✖ | ✔ | ✔ | Video processing, ML inference |
| Additional camera (CSI/USB) | ✖ | ✖ | ✔ | ✔ | For transmission/target recognition |
| Stabilized video TX (HDZero, DJI) | ✖ | ✖ (opt.) | ✔ | ✔ | Quality for ML/analysis |
| Lidar / depth camera | ✖ | ✖ | ✖ | ✔ | For obstacle avoidance (optional) |
| Modem/Telemetry (433/915 MHz) | ✖ | ✔ | ✔ | ✔ | MAVLink/RTPS to ground, + RTMP video |
Step-by-step LEAN Build Checklist
Version 1: Minimal RC Drone
- Buy frame (500 mm) and assemble the body
- Install 4 motors and 4 ESCs
- Install Cube Orange + power module + GPS
- Configure ArduPilot (stabilization, RC binding)
- Test arm/disarm, Stabilize and AltHold modes
- Conduct first flight without FPV
Version 2: Video Transmission to Controller
- Install analog FPV camera + VTx
- Install video receiver (to controller or external screen/goggles)
- Verify video signal and stability
- Optional — install telemetry for OSD
Version 3: ML Integration
- Install Jetson Nano/Orange Pi + CSI camera
- Run ML inference on video (YOLOv5n/8n)
- Send results to ground station via MAVLink (custom messages)
- Duplicate video stream for ground analysis
Version 4: Automation and Analysis
- Install depth camera / lidar (if required)
- Enable navigation based on SLAM (e.g., RTAB-Map or PX4 avoidance)
- Implement target filtering and display only relevant ones
- Create a control interface (QGroundControl, web panel, etc.)
Additionally: Software and Protocols
- ArduPilot: firmware for Cube Orange
- Mission Planner / QGroundControl: configuration and control
- MAVLink: drone-to-ground communication
- GStreamer / RTMP / UDP: video transmission to ground
- YOLOv5 / YOLOv8: lightweight object detection models
- ROS2 + MAVROS: for automation
Configuration for the 1st version
Work on the first version showed that within the available budget (around $1000 USD), it is not feasible to build a cargo drone. While it is possible to find motors capable of lifting 10 kg (5 kg own weight plus 5 kg for sufficient thrust to ensure stable flight and maneuverability), the real issue lies in the battery — it is difficult, if not impossible, to find a battery with the necessary instantaneous current output and charge capacity to support over 30 minutes of flight.
There are motors on the market with lower power consumption, but they are significantly more expensive. The battery alone would also end up being quite costly.
Based on this, it was decided to pivot the project toward building an FPV drone as an alternative to the DJI Mavic.
Component List for Version 1
There was a strong desire to use domestically manufactured components from the following producers:
However, not a single one of them responded to my inquiries. I conclude that retail implementation is not of interest to them. Albatros and Geoscan offer complete solutions, but their prices are far beyond the budget (around 1,000,000 RUB in the case of Albatros solutions).
As a result, the components were sourced through mass-market platforms.
Thrust Calculation and Motor Selection
The initial requirement was to lift 5 kg. In practice, motors should be chosen with thrust that is one‑and‑a‑half to two times the weight of the drone they are lifting.
Thrust depends not only on motor power but also on the size and number of propellers; these factors will be discussed separately.
At first, the motors that met the needed thrust were far beyond my budget—USD 100 – 150 instead of the targeted USD 30 – 40. Motors with the desired specifications do exist in the lower price bracket, but their combined maximum current draw is 160 A, which is excessive and makes sourcing a suitable battery difficult—not to mention expensive.
These budget constraints led to a pivot: instead of a cargo platform, the product shifted toward a drone carrying only a small extra payload for area inspection—an affordable alternative to the DJI Mavic.
Once the technology is refined, we can revisit the development of a more heavy‑lift version.
Propeller Selection
Propellers generate thrust by accelerating airflow. However, the higher the rotational speed and diameter of a propeller, the greater the aerodynamic losses and the power demands on the motor. This does not always result in the expected increase in thrust—especially if it also increases the system’s weight (notably the battery).
What does this mean? It means that the seemingly logical idea of using more powerful motors and longer propellers to increase thrust won’t necessarily yield better—or even workable—results.
Moreover, more powerful motors consume more energy, which requires higher-capacity batteries. In most cases, such batteries are also heavier. As a result, any gain in thrust may be offset by the increased battery weight.
Propeller selection happens in parallel with motor selection. Suppliers usually provide summary tables showing motor thrust capacity and power consumption with different propellers.
There are also two types of propellers: standard (CW) and pusher (CCW). These spin clockwise and counterclockwise, respectively, and are structurally different. The reason is to counteract torque; otherwise, the drone would spin uncontrollably around its own axis.
A quadcopter requires a pair of each type, installed opposite each other—CW across from CW, and CCW across from CCW—to maintain flight stability. I’ll need to study their dynamics in more depth, but for now, this basic knowledge is sufficient for the current development phase.
Electronic Speed Controllers (ESCs)
Power and control signals are not delivered to the motors directly—they pass through Electronic Speed Controllers (ESCs). Each ESC must be selected based on the maximum current
There are distribution boards available that route power to multiple motors simultaneously. Initially, I considered using such a board. However, further analysis showed that the selected four motors would draw up to 120 A at full thrust—a dangerously high current. Without a dedicated cooling system, such a board would likely fail under that load.
As a result, I opted for a more robust and modular approach: using a separate ESC for each motor.
It is also important to check compatibility between the ESCs and the flight controller, particularly regarding voltage levels and the signal protocol used (e.g., DShot, BLHeli, etc.).
Battery Selection
The battery is a critical component and deserves special attention. Its key parameters include:
- Output voltage
- Capacity (mAh)
- Maximum continuous discharge current (often expressed as a C-rating, e.g., 25C)
- Number of cells in series (e.g., 6S, 12S)
- Connector type, such as XT60 for power and a separate one for cell balancing during charging
Unfortunately, my multi-day search on Wildberries and AliExpress revealed that the advertised specifications (especially discharge current) often do not match the actual capabilities of the battery, based on analysis of the available data. Selecting a reliable battery and trusted supplier remains one of the key current challenges.
Case Study #1
A supplier provided detailed specifications and even named the exact cells used—a rare level of transparency. However, checking the manufacturer’s datasheet revealed that the cells only deliver 22–25 A each, meaning the total output would be around 75 A instead of the claimed 120 A.
Case Study #2
A battery labeled as 6S3P with 12,000 mAh capacity and a discharge rating of 135 A implies that each cell must deliver 45 A.
Only high-end cells like Molicel can provide that current—and only with active cooling. The next best, such as Samsung, deliver around 35 A under similar conditions.
Given current wholesale prices, Molicel cells cannot cost less than 500 RUB each, meaning the total battery cost alone exceeds the seller's listed price by about 10%, even before accounting for wires, connectors, assembly, and margin.
These issues may explain why major Russian drone manufacturers like Geoscan purchase only the battery cells and assemble their own packs in-house—likely to maintain quality control.
Long-term solutions could include:
- Establishing direct relationships with reputable battery manufacturers
- Assembling battery packs independently using verified components, which would simplify quality assurance
Flight Controller
The flight controller is the brain and heart of the drone. It serves as the central hub to which all peripheral devices connect, including:
- GPS navigation systems
- Radio receiver and transmitter
- Other onboard sensors and modules
The market offers a wide range of flight controllers, varying in price and features. During my initial research, I found the Cube Orange flight controller particularly appealing. It offers sufficient functionality for the first version of the drone, while still leaving room for future upgrades and enhancements.
At this stage, it's important to check:
- Power compatibility: Voltage and current requirements
- Signal protocol compatibility: Ensure the controller supports the same motor and ESC communication protocols (e.g., DShot, PWM, etc.)
- Radio system compatibility: Confirm that the controller is compatible with the radio communication protocols used by your transmitter and receiver
Radio Control System
For a drone that needs to operate reliably at distances over 10 km in complex environments (forests, suburbs, dense urban areas), selecting a robust and long-range radio control system is critical. Standard protocols like FlySky or FrSky often lack the required range and signal stability.
Chosen Configuration
After reviewing available options, I chose the Radiomaster TX16S transmitter with an external TBS Crossfire Nano SE V2 module. This setup offers:
- Support for CRSF protocol – known for minimal latency and high signal reliability
- Compatibility with the Cube Orange flight controller
- Proven reliability in FPV and industrial use cases
- Excellent value for its feature set
Why Crossfire?
- Operates on 868/915 MHz – better penetration through obstacles like trees and buildings compared to 2.4 GHz
- Ideal for flights below treetops or rooflines
- Supports bidirectional telemetry: real-time signal quality, GPS data, battery voltage, speed, altitude, etc.
Why TX16S?
- Modern multi-protocol transmitter with external module support (ELRS, Crossfire, Tracer, Ghost, etc.)
- Runs on EdgeTX firmware – highly customizable interface for channels, functions, telemetry
- One of the most popular and trusted transmitters in the RC community
Antennas and Signal Reliability
- Drone antenna should be placed away from ESCs, battery, and carbon frame components to avoid interference
- Diversity setup (two antennas) is recommended for greater link stability
- Correct polarization and orientation of antennas is essential, especially for long-range flights
Regulatory Considerations
Use of 868/915 MHz frequencies may be subject to regulations in certain countries (including Russia). Equipment might require certification or adherence to power limits (e.g., max 25–100 mW). Always ensure your gear is compliant with local laws.
Power Distribution Board (PDB)
Due to the large number of components that require power from the main battery (motors, ESCs, flight controller, GPS, etc.), an intermediate Power Distribution Board (PDB) is necessary to properly route and manage electrical power.
Selection Criteria
- Must support the required current load for all connected components
- Should be compatible with the number of motors and other peripherals in the system
- Needs to have the correct connectors or pads for clean and safe wiring
Practical Considerations
Some PDBs, including the one I selected, do not include the power connector by default. In such cases, you’ll need to order the connector separately and solder it manually.
Attention to detail during selection and installation ensures safe and efficient power distribution to all systems.
Post scriptum
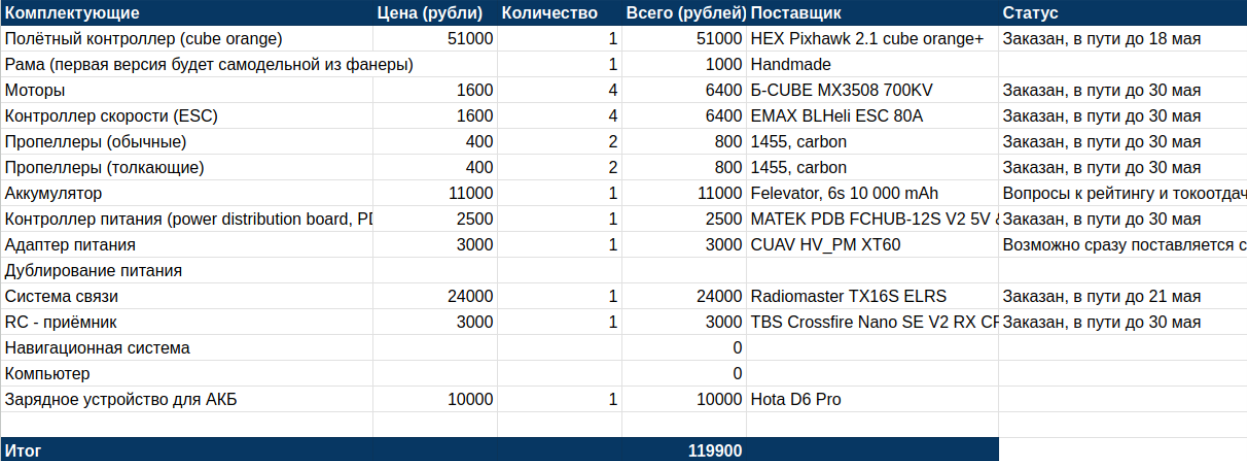
The bill of materials has been formed and the most of custom components has been ordered. Next step will assembling it all together, calibration, testing motors and constraints of what is possible within this configuration. In general validate ideas and calclations before make a next step
A few related posts:
Flying Drone DIY, part V: custom autopilot programs -- improving computer vision of drone
Flying Drone DIY, Part IV: custom autopilot programs
Flying Drone DIY, Part III: Assembling and Tuning
Flying drone DIY, part I: discovery phase